Sunday, September 29, 2013

Owl cupcakes


Owls seem to be a popular trend right now. I've seen them everywhere lately. Which I find very understandable, they are beautiful animals. They also represent wisdom and helpfulness, which is something that we could use more of all the time. When I found that owl cupcakes on Pinterest, I just had to try them. They were so cute! owl cupcakes


The items that are needed are the following: 
-chocolate cake mix
-whatever is called for with the cake mix (eggs, water, oil, etc.) 
-chocolate frosting
-cupcake liners
-cupcake pans
-Reese's pieces 
-measuring cups
-spoon
-bowl
-Oreos

1. Preheat oven at the temperature the box says. 

2. Put cake mix and others items called for on the box in a bowl.

3. Mix items together. 

4. Put mix into cupcake pan with liners 

5. Bake then put the cupcakes in freezer for 20 to 30 minutes.

6. Pull the cupcakes out of the freezer and frost them 

7. Take Oreos and split in half and placing the side with frosting onto the cupcake.

8. Then add two brown Reese's as eyes and an orange for the beak.

There you have it, Owl Cupcakes. A few things that I did differently was I didn't use frosting to stick the Reese's onto the Oreo's, I simply just stuck them on and it worked perfect. I also didn't put the Oreo's into the microwave but i think it would have smart to.  I also skipped using toothpicks for ears but it could have made them look cuter. I also learned that you get about 14 sets of eyes from each pack of Oreos, which isn't something any other pin posted.
I hope you enjoy this post!
-AM


Sunday, September 22, 2013

Fabric Covered Letters

For anyone who doesn't know this about me I love to decorate my apartment and find cute new things to put up and change it up throughout the year. I have a wall that I am trying to decorate right now and just wanted something different. So when I saw yarn covered letters while looking through pinterest I got excited and had to try it out! DIY Yarn Wrapped Letters is the pin that I used. I had a lot of fun with this project and hope if you try it out you will too.

The items you will need for this project are:
  • Wood or cardboard letters or shapes. 
  • Hot glue gun
  • scissors
  • Yarn. 
You can find all of the supplies at your local craft store. I found all mine at Michael's.

Steps to making your yarn letters.
1- Warm up your hot glue gun.

2-Put hot glue yarn onto back of the letter 

3-Wrap yarn around the letter. I found it easiest to cut the yarn into long strands.

4-Hot glue every fifth wrap to ensure that it will stay on the letter.

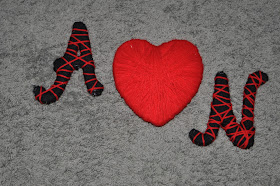
Then once you are finished this is what your finish product could look like. 


I wrapped mine different then Sarah did on her post as well as I had two colors on my letters. I found it easiest one the ends to wrap them first and going in a circle while the pin said to wrap them different. I also had different shaped letters and mine were made of wood verse cardboard. I love how they turned out and can't wait to get them up on my wall. I hope that you enjoy doing this project like I did. It's pretty easy and so much fun!

Sunday, September 15, 2013

Homemade Funnel Cakes

As you may have noticed it is fair season. I love fair season, it's my favorite time of the year. For me, it means it's both my birthday and my boyfriend's birthdays. I have spent my 12th birthday to my 18th birthday at Salt Lake County Fair showing livestock. My family always made it a big deal and decorated my pen and my uncle always bought me a funnel cake with strawberries on it for my birthday. So funnel cakes are a favorite treat of mine for more of a sentimental reason and of coarse the fantastic taste of them!
What do you think of when you think of going to the fair? Do you think about the carnival rides? perhaps the animals? or is it fried foods? One of the main fried foods   is funnel cakes, you can see huge signs leading you to funnel cakes when you walk onto most fair grounds. I could personally eat funnel cakes all year around, so one night I started looking for a homemade funnel cake recipe. So browsing through pinterest I found one! Here is the one I found: DIY Mini Funnel Cakes! I decided to give it a try and my results are the following.


The items in the picture above are what you need:
  • 2 eggs
  • vegetable oil (to use for frying)
  • 1 cup of milk
  • 2 cups of Baking mix (Bisquik, Pioneer, Etc.) 
  • Toppings for Funnel Cakes (Powder Sugar, Whipped Cream, Syrup, Chocolate Syrup, Etc.)
  • Bowl
  • Tongs
  • Pan
  • Spoon
  • Candy Themometer
  • Measure Cups
  • Cupcake decorating tube
Steps to making Funnel Cakes:

1- Start my adding oil into a pan and warming the oil up to 300 to 350 degrees F, using the candy thermometer to check the temperature of the oil.

2- Mix the 2 eggs, milk, and baking mix together

3- Put mix into cupcake decorating tube


4- Squeeze Mix into frying pan


5-Let fry for 30 to 60 seconds on each side using tongs to flip and remove funnel cakes from oil


6- Put funnel cakes on paper towel to dry off.

7- Put desired topping on your funnel cake and Enjoy!


I followed the instructions on the pin and it worked pretty well, I had to leave my funnel cakes in the oil for about 50 to 60 seconds on each side verse the 30 like it said but they still turned golden brown for me. I also used a cupcake decorating tube without a tip instead of a dispenser bottle and it worked perfectly.  I also used tongs to flip and remove the funnel cakes from the oil instead of a slotted spoon which I liked and felt as though it was a lot easier to do. I also switched to pioneer baking mix instead of bisquik either will work fine and I plan on trying it with bisquik next time I make it to see what the flavor difference is.

Everyone in my family seemed to enjoy them. I'm not sure who ate more, my brother or sister. They kept asking me to make more. I doubled the recipe and we had none left.  My dad said they weren't as good as the ones at the fair but they were still good. Make sure if a child is helping you to supervise them putting the mix into the oil because it is very hot and can burn your skin. I hope you enjoy this recipe like my family did!

Sunday, September 8, 2013

Bridal Cake Dress

So one of my good friend is getting married rather soon, and I happen to be one of her bridesmaids. One weekend the maid of honor and another one of the bridesmaids came together to do a test run of the cupcakes bridal dress and then did a final run of the cupcake dress for our friend's bridal shower. The bride loves cupcakes, they are one of her favorite treats so it was super easy to use this to please her. I think we did a fanatic job and it turned out really cute. I found the idea off of pinterest and got all the items that we needed.

Items needed:
-A bowl
-A mixer
-Cupcake pan
-cupcake liners
-frosting
-frosting bag
-Spinkles
-Cupcake mix 

1. Mix all the ingredients together and place them into to the cupcake liners which should be in the cupcake pan.

2.Bake the cupcakes

3. Let the cupcakes cool completely, best method is by placing them in the freezer.

4. Using a swirling motion put the frosting on the cupcakes.

5. Decorate with the sprinkle with your own taste

6. You will need a total of 28 cupcakes to make the dress. To create the dress look place 6 cupcakes on the bottom, 5 on the following level, 4 on the following, 3 on the next, 2 on the next, then 4 on the final two. You will then have a bridal dress made of cupcakes.


The bride loved her cupcake dress, which was the main point. I think it turned out really cute. This could easily be changed for any type of dress simply by changing the color of the frosting. I did change the placement of the sprinkles and places them more according to the brides actually wedding dress, which I believe made it more personal to her and closer to her style as a bride.


Sunday, September 1, 2013

Fall Wreath

Hello All!
So this is my first blog post, so hopefully I can figure everything out and make it go smoothly. For my English class this semester, one of the assignments is to create a blog about something I am passionate about and want to learn more about. I love to bake and do crafts but rarely get to because of how busy my life is, so I saw this as an opportunity to and jumped at it. I am looking forward to trying something new out each week. 

This blog will be switching from different crafts and cooking or baking ideas that I find off of Pinterest and try out to see if they are even possible to create. Then I will compare and contrast what I did verses what they did. I will also post multiple pictures on here so you can see the process. I am excited about this blog and hope that you will enjoy it and try some of them out.

This week for my first blog post, I created a fall wreath since it is September 1, I thought that it was entirely appropriate and a fun idea. I came up with this idea due to my boyfriend taking down my current wreath and telling me i needed a fall decoration and stuck up one of those dollar store scarecrows.. It's not cute at all, so I looked at Pinterest and found several cute ideas. Mine is not exactly the same as the one that I found but had some general instructions that I did use. Fall Wreath Pin


The picture above are the items you will need 
The items you will need are-
  • Fake Flowers, Pumpkins, Leaves, Feathers, etc.
  • Grape White Wreath
  • Ribbon, Bow, or other decor (I did an owl)
  • Hot Glue Gun and Sticks
  • Wire Cutter/Scissors
I got all the items I needed at Michael's but most of the stuff you can get at any local craft store.

Steps to create a wreath-

1. Cut off all tags

2. Take the flowers off the stems, some you will need to cut off others you can just pull off.

3. You will then arrange them according to your personal preference.


4. Following that you will hot glue the bow/ribbon/owl onto the wreath then flowers/pumpkins/feathers/etc then add your leaves.


It's a pretty easy and a straight forward process but everyone's will turn out differently and reflect your personality. I was able to follow the pin's instructions and it worked out perfectly fine. Although i did change some of it up like getting an owl instead of a bow or wooden letter, which there are several little extras you can add and choose from. Here is my finished project verse the pin's I used.
This is the one I created.
This is the one from the pin.
Photo Credit: Katelyn Harris